On-Site Computer service- Coos Bay, North
Bend, Lakeside, Hauser, Coquille, Myrtle Point, Bandon, Reedsport, Coos
River, Allegany, Fairview and others. Call for more information.
How to change or upgrade your CPU (Processor).
These instructions are to help you change your own
processor when you have a problem or just want to upgrade your CPU. The
instructions and images here are for an Intel Socket 478 processor, but
the instructions are similar in most desktop applications.
First shut off your computer.
Take the side cover off of your computer.
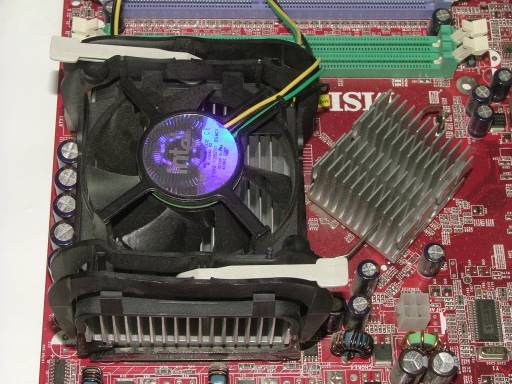
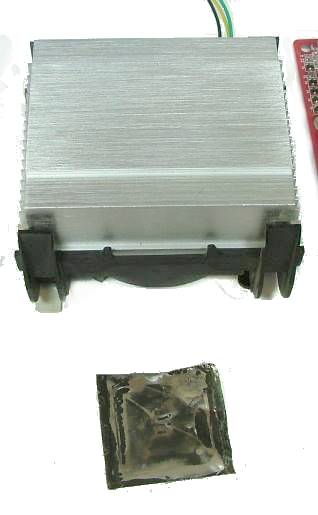
You should see a large fan and aluminum heatsink similar to this.
Click images to enlarge. The larger image will
open in a new page.
On an Intel 478 CPU heatsink there is a lever on both sides of the top
of the heatsink. Unlock them by flipping them over in opposite
directions from each other.
Now the the levers are loose you need to hold the finned aluminum part
of the heatsink and give it a light twisting motion to get it to come
loose from the processor. I have actually had the cpu come out with the
heatsink it was stuck on so hard. If gently twisting back and forth
doesn't break it loose then you can try gently pulling up on the
heatsink. There are four clips that hold the heatsink and fan down to
the mainboard. Make sure that these are unhooked before trying to finish
removing the heatsink. I have noticed that as you unhook one side the
opposite side wants to hook itself back to the bracket on the mainboard.
Just pay attention and you'll get it.
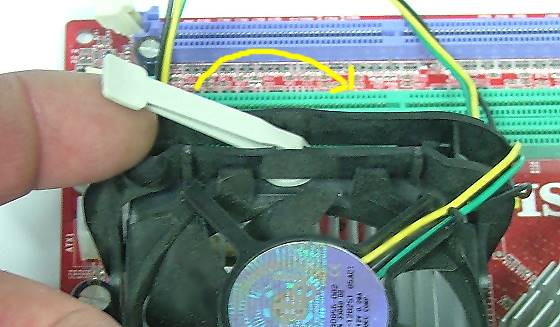
Now that the heatsink and fan are loose, don't forget to unplug the fan
from the motherboard. It is three wire connector that normally has a
brown end and plugs into the mainboard. There are adaptors that allow
you to plug this type of connector into a Molex connection that comes
straight from the power supply so if you don't see a connector plugged
into your mainboard like the one in the image below, look for the
wires from your fan to be plugged right into your power supply.
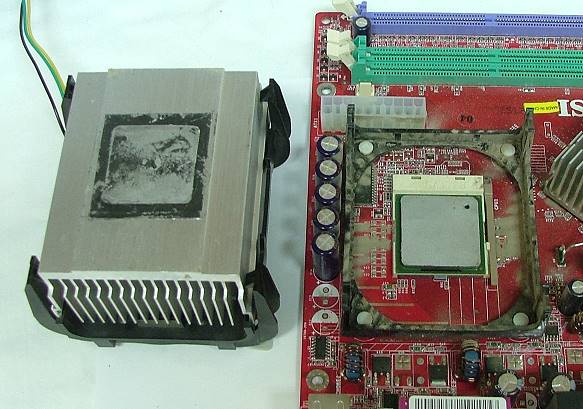
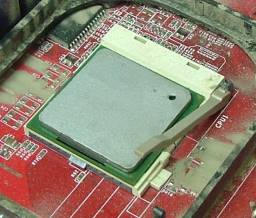
The processor exposed after removing the heatsink. This CPU had the
original thermal tape on it. To help keep the processor cool we will be
changing that in the final steps.
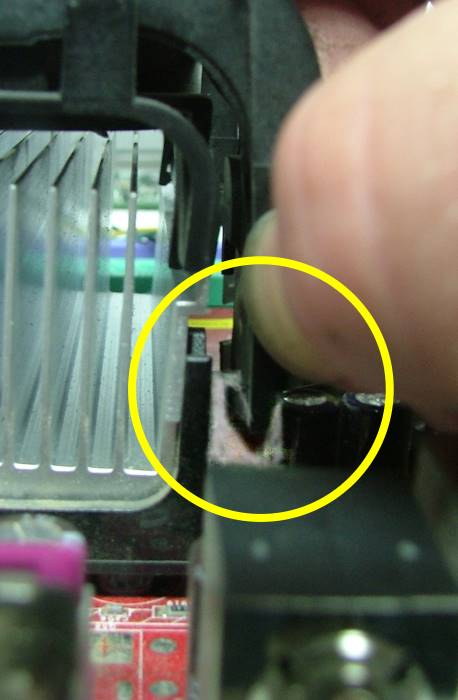
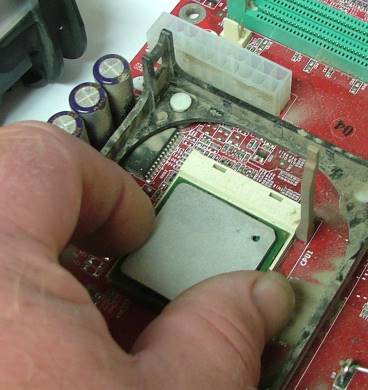
Unhook the lever that locks the processor in the socket. Depending on
the system board manufacturer this may be plastic or metal. The one on
this MSI board is brown plastic.
After lifting the processor lock lever up to its unlocked position,
remove the old processor.
Your next step is to blow off the dust from around the socket. Canned
air will do well but if your board looks like this one did, you may want
to unhook your computer and take it outside. This was a dead board so I
didn't bother to clean it for the pictures. I felt guilty so I cleaned
it for a picture. This is what it looked like after I decided to blow
the dust off of it. Note: Do not use a vacuum to the inside of
your computer. The air and particles that pass through the plastic hose
can build up a static charge that may zap your board and render it
useless.
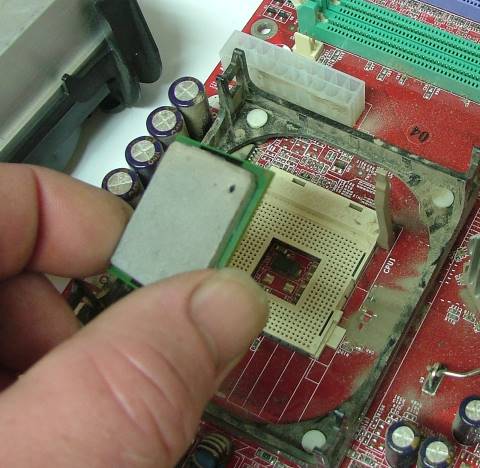
Before inserting the new processor you need to make sure that you pay
attention to the way you are putting the new CPU in. On this socket
design there are two missing pins from one corner of the socket. This is
so you don't put the processor in the wrong direction.
Making sure the processor is oriented the right direction put the new
processor in the socket and put the lock lever back in the locked
position.
Now we need to put the heatsink back on. In order to do that and not
have overheating problems we need to remove that thermal tape I
mentioned earlier. The purpose of thermal tape is the same as thermal
grease. It is to make a better contact between the processor and the
heatsink as good as it can be. Most people don't like to use the thermal
tape and feel that they get better contact with the paste. Either way,
you will need to remove the old before putting on the new thermal
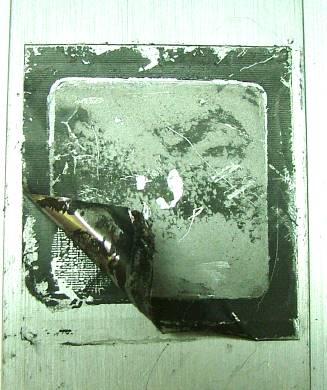
compound. Now lift an edge and start pealing!
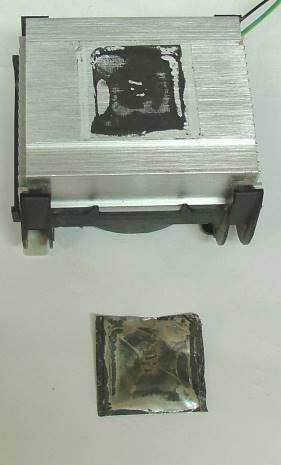
The end result should look like this. Notice the black residue left
behind. You can easily remove this residue with Lacquer thinner or
Acetone and a paper towel. These should be used in a well ventilated
area (read label on can).
Heres what your heatsink should look like before you reinstall it. Some
heatsinks have a copper core but these also need to have heatsink
compound on them.
The compound of choice for most people is Arctic Silver. Now Arctic
Silver is a brand name and has several types of compounds available.
Most people (including myself) like the silver. The tube I have here is
"Arctic Silver 5". A tube of this runs about $5 to $10 depending on
where you purchase it. I did notice that Radio Shack had it in blister
packs the last time I went in looking for something. It was $10 there
and I got mine from a local computer store for $5.
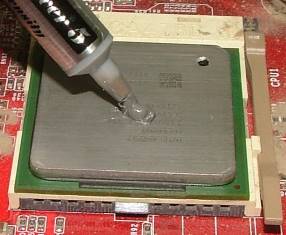
You will only need a little bit of this compound as seen in the picture
below. Since this is a metallic compound I caution you to not use too
much and have it make a mess on your system board. That might make the
board short out. My rule of thumb is to put just enough on to be able to
put a thin even coat across the face of the processor (about the size of
a BB normally works okay. The heatsink compound is hard to get off of
you. Don't get this stuff all over the place. Make sure to wear a latex
glove or wash your hands right away if you decide to spread the compound
out with your finger like I do. I keep some paper towels handy for
emergency wipes and cleanup.
Now that the CPU is prepped and ready to go, put your heatsink back on
and lightly twist it back and forth a little bit to seat it into the
compound you put on. Make sure that all four clips are hooked to the
bracket on the mainboard.
Flip the two cam levers back to the locked position. (if you have this
kind of heatsink
Plug the processor fan back in where it was when you unplugged it.
Notice that the one connector in the image below has two tabs on it that
align with the terminal on the mainboard!
Your processor should be ready for use.
Put the side cover back on your case and plug the power cord back into
the tower. Hit the power button and enjoy!
Note: Some computers will give you a message about processor changes.
Somewhere you should see a way to continue (normally the F1 or enter
key). Once you have booted with the new processor in place and have told
the computer to continue you should not receive the message again.
If this helped give with the PayPal Make a
Donation button.
Please
leave a comment with your Donation. Thanks... Dale
This
recently added counter saves unique visitors. It does not count return
visitors.